How to check the pressure switch of the washing machine if there is no extra money to call the master? If your washing machine's warranty has expired, you can do it yourself. However, before you check the pressure switch of the washing machine, you need to know where it is, what it is and understand the principle of the water level sensor.
How the pressure switch works
Each washing machine is equipped with a water level sensor (pressure switch). It serves to send an electrical signal to the washer controller about the presence or absence of water in the tub to perform further operations for the set wash program.
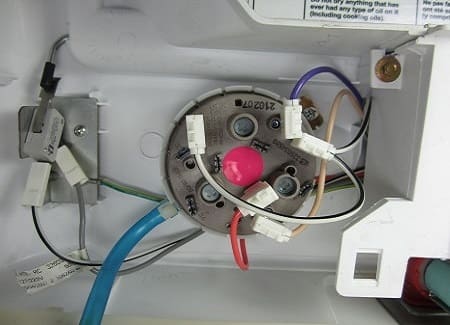
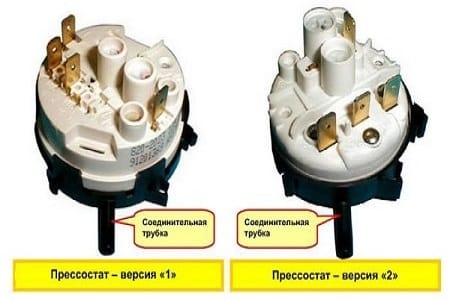
The standard pressure switch consists of a disc-shaped sealed housing with an air chamber inside. A tube is connected to it through a fitting, lowered by the second end into the tank of the machine. When water enters the machine, the air pressure in the tube and the pressure switch chamber increases. The sensing diaphragm begins to lift the stem, which presses against the spring loaded contact plate.

When a certain level of liquid in the tank is reached, the spring plate switches to the upper position with a click, closing the electrical circuit of the sensor input lamellas. If the contents of the tank are drained, the pressure in the chamber decreases, the stem moves down and the contact plate switches to the lower position, breaking the electrical circuit. At the signal of the pressostat, the controller issues control signals to other actuators (drain pump, engine, inlet valve, heater relay).
![]() See also - What if the washing machine does not open after washing?
See also - What if the washing machine does not open after washing?
Signs of a defective water level sensor
Failure or malfunction of the pressure switch leads to disturbances in the operation of the washing machine. Outwardly, symptoms of a water level switch malfunction may look like this:
- the machine washes or turns on the heater when there is no water in it;
- the tank is overfilled with water, or vice versa, it is clearly not enough for washing;
- when the rinsing mode is turned on, periodic pumping out and supply of liquid occurs;
- the appearance of a burning smell and operation of the heating element fuse;
- the laundry is not spinning.

The appearance of such signs should be a reason to check the performance of the pressure switch, for which you need to arm yourself with a screwdriver with replaceable nozzles, since many manufacturers use fasteners with special heads to protect against unauthorized access.
![]() See also - The drum does not spin in the washing machine
See also - The drum does not spin in the washing machine
How to check the pressure switch yourself
The above deviations in the operation of the washing machine may be the result of a malfunction and other details, so you need to check the performance of the pressure switch before installing a new one. To do this, remove it from the machine. Where is the water level sensor in the washing machine? In order to find and check the pressure switch, you must perform the following steps:
- by unscrewing two bolts from the back of the washing machine, remove the top cover of the machine with a shift back;
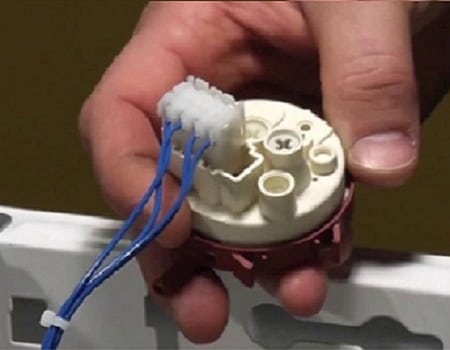
- on the side wall, find a pressure switch fixed with screws, disconnect the connector with wires from it and the hose connected to the fitting with a clamp;
- unscrew the fastening bolts and dismantle the unit.

Carefully inspect it and tubing for external damage or blockage. If necessary, clean the tube and fitting. The outer lamellas on the connector must be clean and free from oxidation. If they are dirty or corroded, they should be cleaned. The performance check must be carried out in the following order:
- Put a small hose on the fitting and, holding the block to your ear, blow into the hose. When the sensor contact is triggered, a clear click should be heard.
- Depending on the block design and the number of contact groups, the number of clicks when blowing out the hose can be one, two or three. The absence of clicks indicates a malfunction of the device.
- You can verify the reliability of the contacts operation using an ohmmeter by connecting it to the corresponding sockets on the input connector of the unit. When the contacts are closed and opened, the readings of the device will change sharply. The wiring diagram of the pressure switch contact groups can be found in the operating instructions for the washing machine.
![]() See also - The washing machine won't drain - what should I do?
See also - The washing machine won't drain - what should I do?
Setting the water level sensor
The pressure switch is adjusted to the required amount of liquid using two adjusting screws, one of which (central) is used to set the moment of connection of the contacts, and the second (peripheral) is designed to set the moment of their break. There may be several contact groups or sensors, depending on the operating modes and the model of the washing machine. Programs for different washing modes can also use different amounts of liquid in the washing machine, for example, economy or gentle wash, in which the tank is half filled.
Fine adjustment of the signaling device is carried out by specialists at the factory, and the position of the adjusting screws is fixed with paint or varnish. It is not recommended to change their position, since an imbalance in the setting will cause disturbances in the debugged washing program. In order to properly configure the unit yourself, you need to know how much liquid the machine needs at each stage of all washing modes, and in accordance with this, set the moments of switching on and off the contact groups. For example, the pressure switch of a Bosch washing machine has three contact groups configured for full mode, economy mode and overflow.
![]() See also - Washing machine jumps when spinning
See also - Washing machine jumps when spinning
Pressostat replacement procedure
After making sure that the water level sensor is faulty, you can change it to a new one. In the event of a pressure switch malfunction, you can DIY washing machine repair... Repairing the water level sensor does not make sense, since its case is non-separable and attempts to disassemble it will lead to damage to the internal parts. The new water level sensor must be exactly the same type and name as the old one, corresponding to the given brand and model of the machine, taking into account the capacity of the loading drum. It also does not hurt to check it before installing. The unit is installed in the reverse order of dismantling steps:
- fixing in place with fixing screws;
- connecting the hose to the fitting and tightening the clamp;
- connection of wiring with a connector;
- installing the top cover and tightening the fixing bolts.
After completing the repair, you should turn on the washing machine and check the operation in several modes or perform a test wash.
![]() See also - TOP 10 front-loading washing machines - rating of the best 2017
See also - TOP 10 front-loading washing machines - rating of the best 2017


If the pressure switch is analog (electronic), then you will not hear clicks when blowing it out, such a pressure switch is much more difficult to check.
So which screws should you turn?
SMA HAIER HW50-12866ME electronic pressure switch does not fill in water and electromagnetic ubl opens the hatch door this does not happen when the pressure switch is opened - water is not poured, but ubl does not open the door closed with a click ...